It’s been a while since I’ve talked about what I do to avoid worms when sharpening Fujifilm X-Trans files. In the past, I wrote about using Iridient X-Transformer, which was the best tool at the time. I have found that Iridient creates a fair amount of noise, especially in areas without detail. I also noticed detailed areas lost color detail, so I no longer recommend it.
Since I wrote that article Adobe has released new features in Lightroom and ACR, and I have also come up with new sharpening techniques that create incredibly clean, sharp images.
Enhance Details
Let’s start with one of the new features Adobe added to Lightroom and ACR; Enhance Details. This feature was developed specifically for X-Trans files to increase detail and color detail while avoiding the wormy effect. Enhance Details use Adobe Sensei, which is Adobe’s AI or machine learning to improve detail and colors in your images.
Enhance Details can be found in Lightroom under the Photo menu > Enhance Details, or right-click on the file to get to Enhance Details. In ACR click the icon in the Filmstrip and select Enhance Details in the pop-up menu in Camera Raw. You can only use this on a raw file that is an X-Trans or Bayer sensor. When you click Enhance Details a new dialog will pop up.

There are no options, just a quick preview to see if it is worth your while to use this feature. If you click on the preview, it will show you the before image, and you can pan around to different areas.
The biggest downfall of this feature is the fact that it is a sophisticated algorithm that can a long time to process. How fast it processes is a function of your GPU. If you have a fast, modern graphics card, this will breeze by quickly. If you have an older computer, this could take several minutes. I have a 2015 MacBook Pro with an AMD Radeon R9 M370X, and it takes about 30-40 seconds for each image I convert.
When it is finished processing it will create a new DNG file, which is still a raw file, but it has been ‘enhanced.’ Because this process takes a significant amount of time, I do not convert every single file in my library. Instead, I only convert the images where detail is a significant concern and the image will end up in my portfolio.
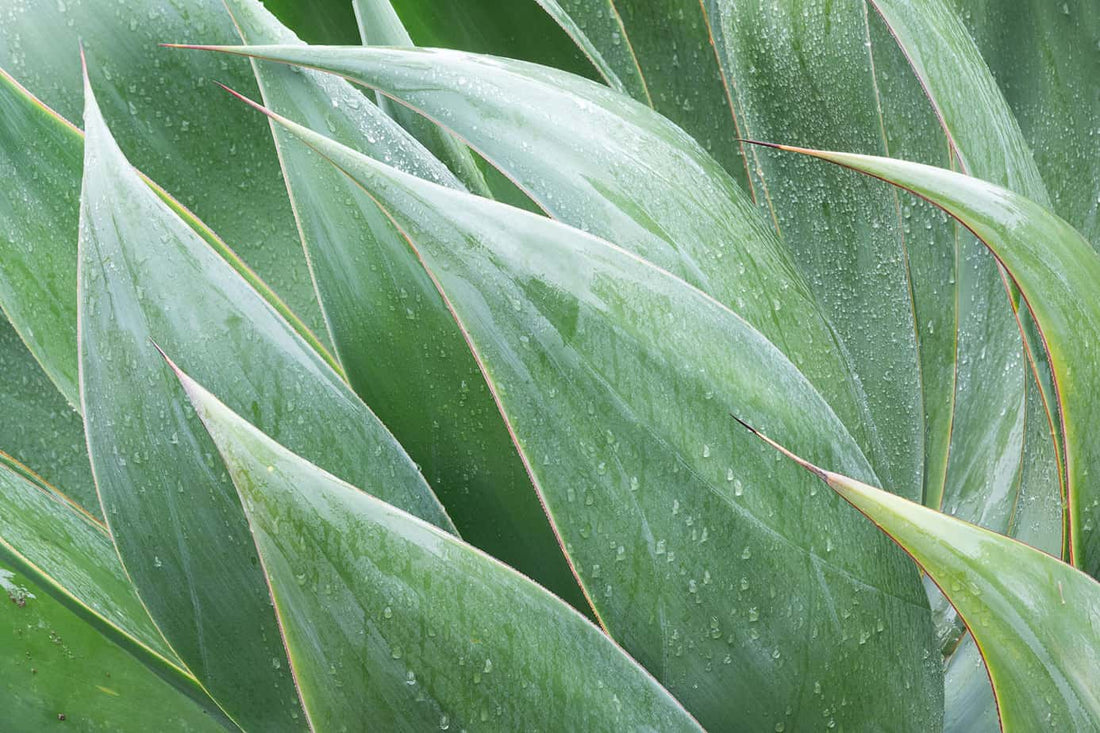
It’s also important to note that this does not need to be applied to every image; on certain images that have little detail, it can have a slightly negative effect. This is best used for scenes that have very high detail, i.e., sand, leaves, rock, anything with a lot of texture.
Texture
Speaking of texture, Adobe recently added a new feature to Lightroom and ACR called the ‘Texture’ slider. This adjustment does exactly what you would think it does; it enhances very fine texture. This, in combination with Enhance Details, can create extremely detailed images. Be careful not to overdo it with this adjustment as it will start to look fake. If your image only has high detail in certain areas, it is best to apply this adjustment local using an Adjustment Brush, Radial Filter, or the Graduated filter.
Sharpening
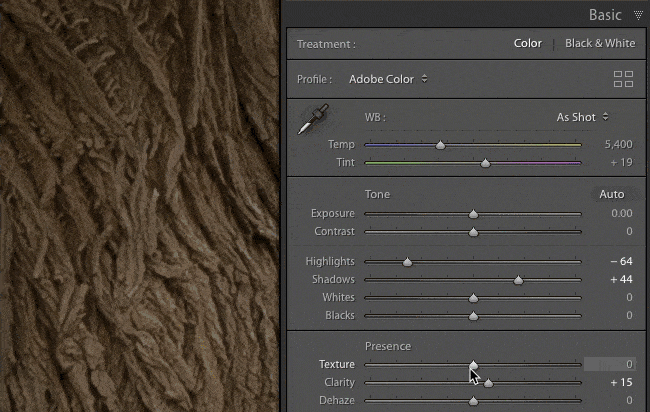
The last piece of getting extremely clean, sharp images with X-Trans files is by using the correct sharpening algorithm. Lightroom has two sharpening algorithms even though they’re not listed anywhere. The two algorithms are deconvolution sharpening and unsharp mask. The way you access these are by using the Detail slider in the Sharpening section. If you slide the Detail slider all the way to the right you are using deconvolution sharpening; if you slide it all the way to the left, you are using the unsharp mask. In between is a mix of these two sharpening methods.
So do we want deconvolution or unsharp mask? If you ‘Google’ Fujifilm sharpening almost every blog you come across will recommend that you slide the detail slider up to 100. The problem is the deconvolution algorithm in Adobe products is what causes terrible worms on X-Trans files. We don’t want worms, so we need to go in the opposite direction. I recommend setting Detail to 0. Try it yourself while setting the Amount very high; Detail 100 = wormy mess, Detail 0 = no worms.

When you use a Detail of 0, you will notice that you lose detail. The key to bringing back your detail is using a very high Amount in sharpening. I start with 100 and evaluate each image, sometimes I go lower around 80, and sometimes the image can handle cranking it up to 150. When you have the Detail slider low, don’t be afraid to push the Amount quite far.
The other setting is Radius; generally, for landscape photography, you want a very low radius for high detailed scenes. Most people recommend the smallest setting of 0.5; I have found that X-Trans files tend to prefer a slightly higher radius of 0.8 and occasionally 1.0, which is best evaluated while holding down the alt key. I also use masking to remove sharpening from areas that do not have detail, and shadow areas. A good starting amount is 30, but you will need to adjust this for every image again while holding down the Alt key to evaluate.

To sum up my raw processing:
- Convert to DNG using Enhance Details
- Apply ‘Texture’ to areas in the image with high detail using a local adjustment.
- Sharpen using these settings
- Amount – 80-150 (usually around 100)
- Radius – 0.8 or 1.0
- Detail – 0
- Masking – adjust while holding the alt key to remove sharpening from areas without detail and shadow areas.
These settings will give you very clean files and will work well for most people. If you want to take your sharpening to the next level, stay tuned for another article on the additional sharpening that I do in Photoshop when I want incredibly sharp images.
